How To Set Up Your MIner.
First Step: Connections
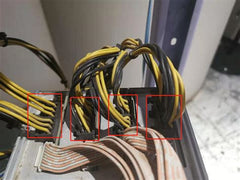
Connect your power supply to the miner with the PCI-E connectors to each hash board as well as the power connector on the control board. (Only applies to miners with separate power supplies)
Next connect your miner’s port and your internet router’s port with the Ethernet cable.

Plug in power for the miner, ensuring you are using the correct voltage, 120V or 240V.


Second Step: Miner Configuration:
You’ll need to locate the IP address of your miner. Download a scanner. https://www.advanced-ip-scanner.com

Once installed, you can run the scanner to identify all of the IP addresses on your network. Your computer needs to be connected to the same network as your miner and router.
Open an internet browser and type the IP address you identified into the address bar.
You’ll type in the user name and password “root” and “root” to login at the popup screen.
The final thing you need to do is apply your pool address, worker name and password into your miner. You’ll find this under the Miner Configuration tab.

The pool address you use will depend on the pool you choose to use to mine through. Please follow the instruction on their site to add a new ASIC miner to your account. If you are unsure which pool to use try https://whattomine.com/coins and https://www.poolwatch.io/ to locate the currently ideal pool for the coins your miner can dig for.
If you have any questions or issues, please don’t hesitate to reach out via e-mail, text or calling.
(888) 509 - 2017